(BAR-42) Caronte... A Sci-Fi Fighter
The other day I watched the movie "Space Rangers", a 2024 low budget
movie, and they had a sci-fi fighter which really tripped my trigger.
So I set out to make a flying model rocket, it turns out to be a stable flyer.
I added some additional pods to carry the altimeter and to just up the awesomeness. I'll likely "sculpt" the nose cone to get something a bit more like the movie bird. Should make for a fun build.
Check out the flick on YouTube, here's a LINK, go to 1:11:50, watch the flick.


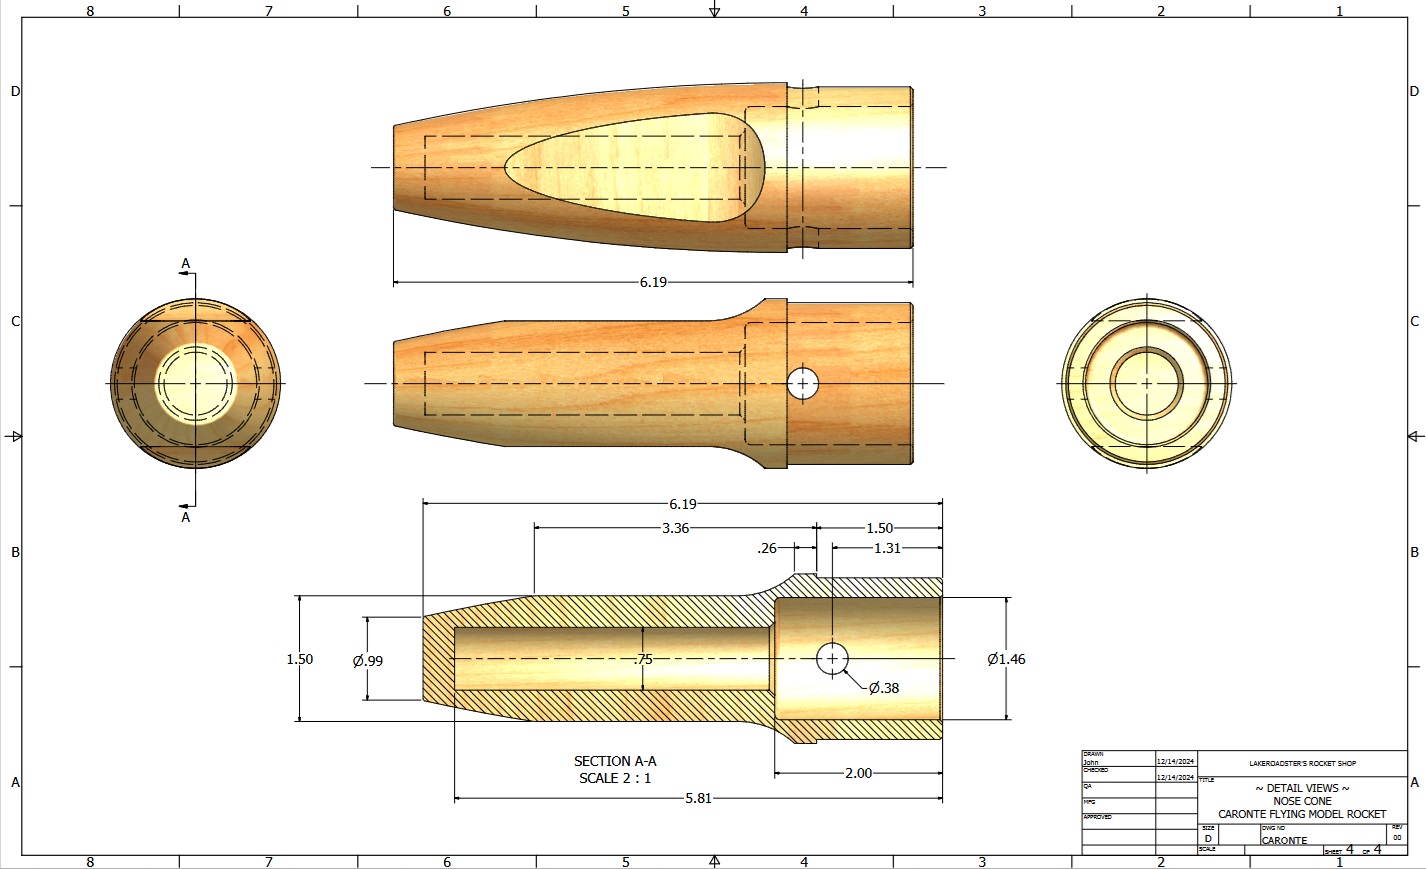
I lathe turned the Nose Cone. The counter-bore was a bit deeper than I had anticipated. No worries, I made a plug for it out of a Poplar Dowel. A bit of Wood Glue and it'll be good.


Modified the Nose Cone a bit by sanding (2) flat spots at 180 Degrees... and glued the dowel in the end.


2025-02-05 A bit more work on the Nose Cone... sanded the tip and drilled for the dowel...
And preliminary CAD Model and Drawing Set


2025-02-06 Plywood Components and Tube


Gluing the Lower Fin to the C-204 Tube


2025-02-07 Gluing the Fuselage...


2025-02-08 Had a bit of a "Red Bull" moment.... "It's Got Wings"

2025-02-09
Built the Center Wing using my fin alignment fixture. It has 135 degree
side angles, so that works perfect for gluing the Side Spill Plates.


A couple of in-process glamor shots...


Installing the Center Wing.
I again used the 12" Scale as a "back
brace". It really helped in making sure the Center Wing was installed
straight and aligned with the outer wings.


And then for drying I inserted some playing cards between the Center Wing and the 12" Scale... just to make sure everybody stays in line.

Well, that was quick! The Center Wing made the Wing Assembly really rigid. Next step is installing the Wing Tips... and they give the rocket that Sci-Fi look it's meant to have.
The Nose Cone is installed in the rear, temporarily, just to make sure everything stays nice and round.


2025-02-10
A couple of in-process glamour shots...


The wing glue joints weren't Hell-For-Stout like I had envisioned so I cut some Half Dowels
from 3/16" diameter stock and glued them under the wings at each of the
(4) joints. I'll add some fillets once they have dried.


2025-02-11
Cut the Lower Altimeter Pod / Air Inlet from the oval BT-60 Tube that I made, then installed the Pod and the Ion Cannons.
Last photo below shows a piece of 1/4" plywood I used to space / clamp the Cannons so they would be vertical.
Last photo below shows a piece of 1/4" plywood I used to space / clamp the Cannons so they would be vertical.


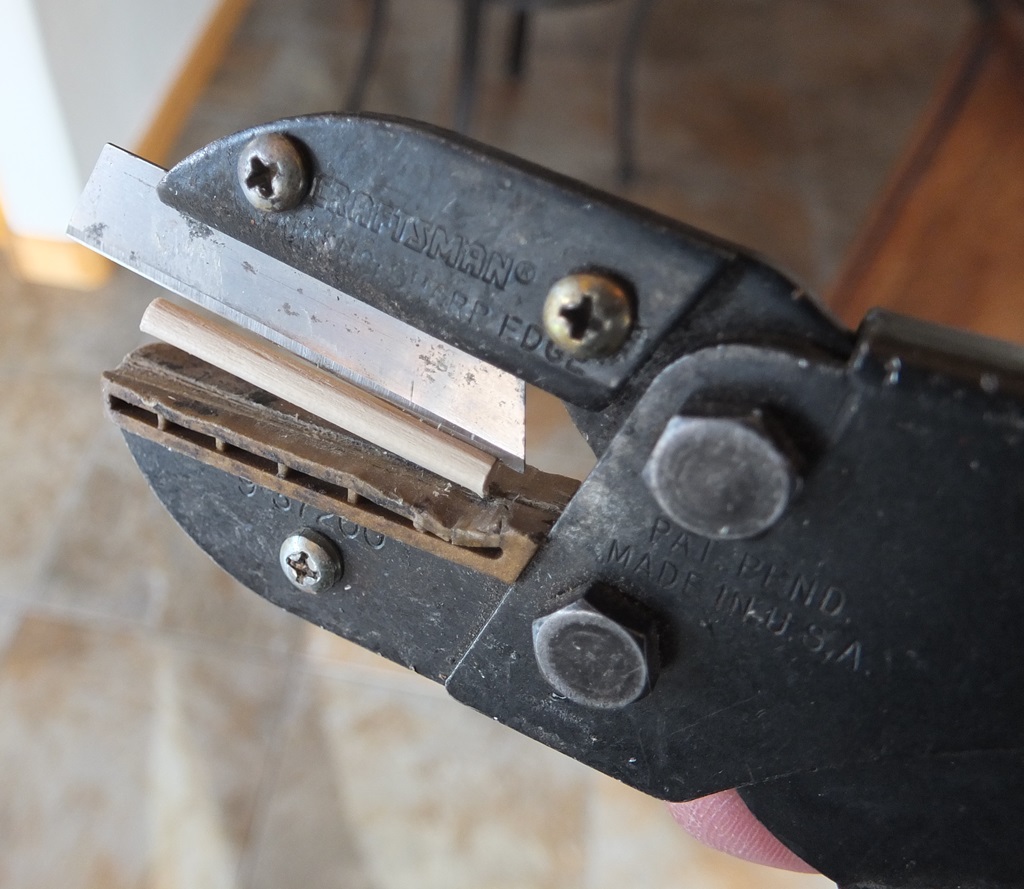
These were made from 1/16" Basswood,
except the spars were made from 1/8" x 1/8" Basswood. Gluing was a bit
tedious, but well worth the effort.
The photo's follow the assembly flow.


Pretty much ready for a swing test, then CWF.
I'm holding off on gluing the nose cone on. I'm anticipating needing much less nose ballast than what Open Rocket is predicting, due to base drag.
I'm holding off on gluing the nose cone on. I'm anticipating needing much less nose ballast than what Open Rocket is predicting, due to base drag.


I loaded the G74-6 Motor and a 24"
Parachute into the Spool and inserted the Spool into the Rocket, secured
by a toothpick between the Rear Centering Ring and the Body.
It performed a stable swing test with zero nose weight. 
Simulation
When I drop the nose weight down from 4
grams to zero in the OpenRocket simulation, the stability goes from
0.986 down to 0.212.
The weight of the simulated rocket matches the weight of the "as swing tested" rocket.
I guess I'll need to think this over a bit... I mean, why add performance robbing nose weight when it tests out OK without it.

2025-02-14 2nd Swing Test
I got to thinking about the 1st Swing Test. I didn't follow Vern Estes instructions and I think that's why I got erroneous results.
The nose of the rocket when attached to the string did not hang below the horizon. Therefore the test may no be accurate.
It snowed overnight and it's still snowing... but I've got a swing test to do.
So,
following Vern's advice I tested the rocket with the nose slightly
angled down. I performed (3) tests, on a different axis' each time.
All three failed. Nose Ballast will be used.


I cut off the shank and threads of a 3/4" HHCS. Weight is 3.6 ounces which yields an OpenRocket stability of 0.943.
Used wood glue to attach the ballast to the nose cone counter-bore.


And the 3rd Swing Test was a success.


2025-02-15 Gluing the Recovery Dowel and the Nose Cone to Body
Recovery Dowel
Cut a 3/8" dia. dowel and glued it into the nose cone.
Nose Cone To Body
Cut some masking tape into 3/16" wide strips and attached them to the front and back of the Nose Cone Shoulder.
Punched a couple of glue injection ports in the Body.
Applied some glue into the Body.
Applied some glue to the Nose Cone Shoulder.
Installed the Nose Cone into the Body.
Injected glue into the injection ports in the Body.


2025-03-05
I applied some Helmsman Spar Urethane Gloss Clear to the Caronte today.
Even with the significant wood glue I think it came out alright.


2025-03-13
Hand painted the body tubes... still need to paint the bore of the fin tubes.


No comments:
Post a Comment