(BAR-36) BTL-A4 Y-Wing Star Fighter
Here's a Star Wars Star Fighter that predates the X-Wing.
It's a 29mm Rear Eject Spool, and uses BT/C-300 for the Body and Nacelles
2024-08-21 Preliminary CAD
Worked on the CAD Model, and then knocked out a couple drawings.
I want to try to make the Command Module 1st... then if that goes well I'll make the rest of the drawings.


I ended up using 3/4" old school plywood scrap that I salvaged from some
shelves in the garage. I glued the (2) intermediate pieces, clamped
them and set them aside to dry.


Profiled the cockpit using my tabletop Disc / Belt Sander.


2024-08-26
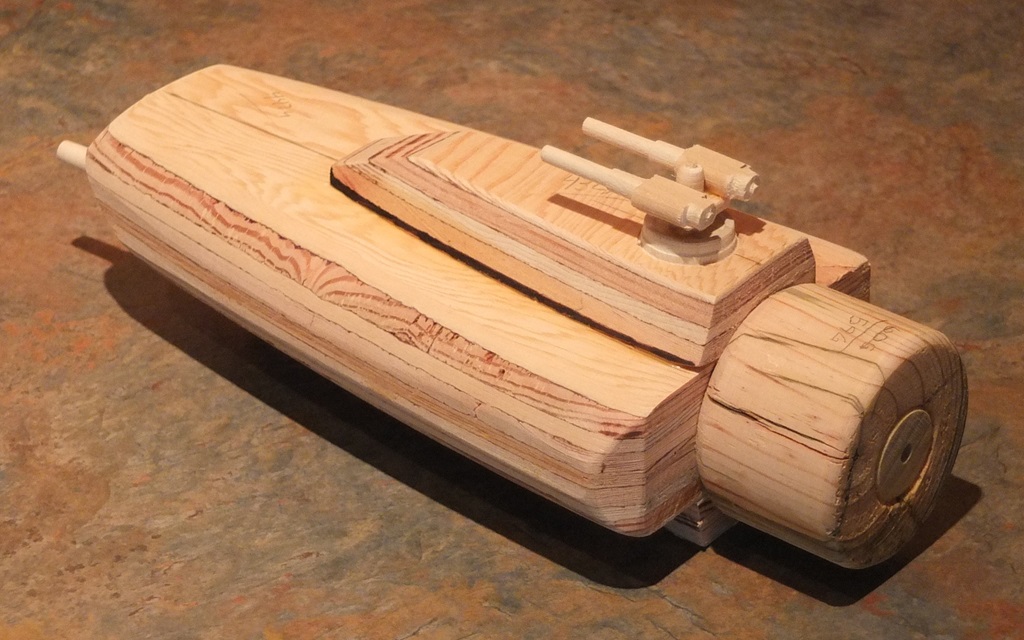
Sculpted the Command Module Intermediate Section... it's big and bulky, just like real (fake) thing.
I had planned to do more sanding, that's why I added the temporary sheet
metals plates. They are there to prevent sanding where the cockpit and
lower bulge pieces glue into place. But in reality they weren't really
needed.
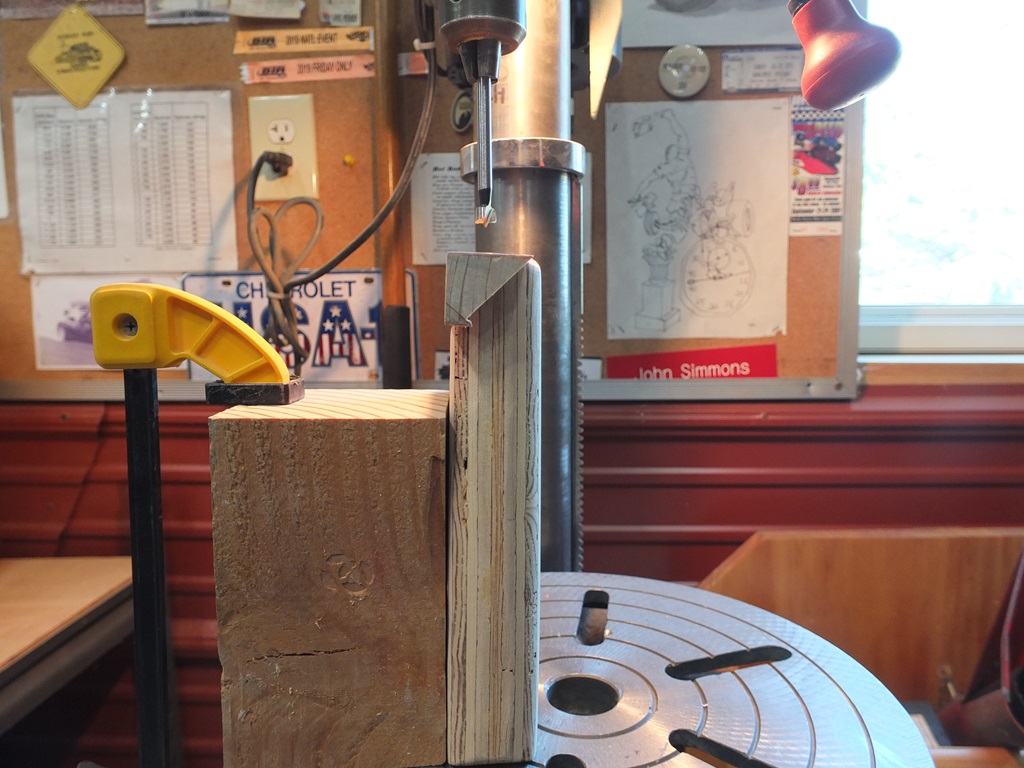
I counter-bored a 1" diameter hole into the rear. That'll mate up to a 1" dowel I'll insert into the hub... which is the next step.
I counter-bored a 1" diameter hole into the rear. That'll mate up to a 1" dowel I'll insert into the hub... which is the next step.


2024-08-27
Made a fixture to drill the holes for the two front mounted Laser
Cannons, then used a 3/8" dia. Forstner bit to drill the holes.
Turned the hub that fits into the C-80 tubing from a scrap 4x4. It had a split which, as you can see from the photos, broke off. I used some Titebond II to glue it back together, secured temporarily with a section of masking tape.
Turned the hub that fits into the C-80 tubing from a scrap 4x4. It had a split which, as you can see from the photos, broke off. I used some Titebond II to glue it back together, secured temporarily with a section of masking tape.
Also a couple of 1" dia. holes under the command module for ballast...
With any luck I'll be able to glue this sub-assembly into the finished part next.
With any luck I'll be able to glue this sub-assembly into the finished part next.


2024-08-28
Drilled (2) 1" dia. holes into the bottom side of the Intermediate Section. These will be used for ballast.
Glued the 1" dia. Pine Dowel into the Intermediate section, glued the Cockpit to the upper surface, and glued the Hub to the Dowel. Using Titebond II Wood Glue.


2024-08-29 Pew-Pew Parts
Spent some time on the wood lathe making pew pew devices and their associated bracketry.
I used some tongue and groove pieces left over from our hardwood flooring project to make the Upper Cannons. The pieces are kind of an elliptical shape... which chucked up in the lathe nicely and worked well.
The Turret is sunk into the top of the Intermediate Section, and the Rotational Shaft the Cannons mount to is recessed into the Turret. There's a piece of 1/8" Basswood that was drilled to slide over the vertical Rotational Shaft, and that is what the Cannons are attached to.
Pretty much hell-for-stout construction that with any luck will hold up to the rigors of thrust, recovery and landing.
So.... looks like I can finish the CAD drawings now.


2024-08-29 BTL-A4 Y-Wing Drawings 1 to 12 Rev 02


2024-08-30
Cut the Body Tubes, Couplers, Nacelle Supports and the Stiffeners.
Then, slotted the Body Tubes for the Stiffeners, glued in the Couplers, poked a gazillion holes in the Couplers using a thumbtack
and then glued in the Stiffeners.
My finger is sore from poking all those holes...
Then, slotted the Body Tubes for the Stiffeners, glued in the Couplers, poked a gazillion holes in the Couplers using a thumbtack
and then glued in the Stiffeners.
My finger is sore from poking all those holes...


2024-08-31
Drilled the Command Module for the 1/4" x 3-3/4" Lag Screw Eye, then
inserted glue into the hole and screwed it into place. Some glue
actually seeped out of the side of the hub.
The Body Tube Stiffener Plates were sanded flat and then glued to the Nacelle Supports. I used some 1" spacer boards and a little over 1/8" of playing cards, both sides, to position the Nacelle Supports at the tube C/L.
I let the glued sub-assembly sit for about 20 minutes, then clamped the sub-assembly with (3) Quick Clamps. A small amount of glue was extruded from the joint.


Rear Nacelle Transitions


2024-09-01 Rabbit Rabbit Rabbit
I took a stab at making some 3 ply transitions out of 0.025 th. cardboard (A "Cliff Bar" box).
- Print out the OpenRocket layout of the transition.
- Cut out the paper template and transfer it to the cardboard.
- Cut out the cardboard transitions.
- Apply glue to one side of the cardboard, and roll it with the glue inside the transition.
- Temporarily hold the splice with a spring clip.
- Apply glue to the second piece of cardboard, and roll it with the glue inside the transition.
- Place the second transition inside the first. Once it's formed all around cut it to length inside the dual sub-assembly.
- Apply glue to the third piece of cardboard, and roll it with the glue inside the transition.
- Place the third transition inside the second. Once it's formed all around cut it to length inside the dual sub-assembly.
- After allowing to dry about 15 minutes place the transition over a suitable round object to hold the round shape.
The first one of these I made I
started on the inside and added the 2nd and 3rd transition wraps to the
outside of the 1st. Yep, it was too big. The OpenRocket template is
based on the O.D. of the finished part. So always start with the template and then add any additional ply to the inside surface.


2024-09-01 Rabbit Rabbit Rabbit
Adding glue fillets to the Naccelle Supports to Body.
Transitions are working out well. I glued them to the Rear Nacelle Tubes, then cut the Rear Internal Fins and started installing them.
Transitions are working out well. I glued them to the Rear Nacelle Tubes, then cut the Rear Internal Fins and started installing them.


2024-09-02 Rear Nacelle Internal Fins... and a preview of coming attractions.


2024-09-03 The Quest For The Perfect Structural Fillet


I use
Titebond Quick & Thick, put on a heavy fillet, and then slowly
rolls the rocket in his hands to get equal fillet legs on the fins to
body joints?.
First photo is the fin glued to the stiffener, and the stiffener glued to the body, using Titebond II and Gorilla Wood Glue.
The 2nd through 4th is the Titebond Quick and Thick.


Bulkheads
The body of the Y-Wing is a rectangular shaped fuselage. So in order to simulate that look I'm using a series of bulkheads installed along the body, that will then by covered in 1/16" th. Basswood.
I used some 1/8" thick Basswood for the Bulkheads. A fly cutter was used to cut the bore and then a scroll saw was used to cut the outer edges.
Quite frankly I figured I would end up with a pile of scrap... but in the end, using patience and going slowly, all went well.
Plus, as a bonus, I can use the circles from the center and turn them down on the lathe to make the Spool Centering Rings.

2024-09-04 Body Bulkheads and Wraps
Installed the bulkheads. I then sanded the sides so they were level and
true. I cut the upper and lower panels from 1/16" basswood and glued
it to the bulkheads, followed by clamping it to hold it in place while
it dries.


Attached another Rear Wrap Panel and started installing the Front Wrap Panels.
I had an idea last night about placing the Launch Lug between the Rear Body Wrap and the Body Tube.... which means it'll sit on the Front Wrap and snake through the Rear Wrap. That means I'll need to cut some slots in the Bulkheads.
Used my Dremel and a sanding drum to make the notches in the Bulkheads for the Launch Lug. Worked out even better than anticipated as the Wrap will fit over the Launch Lug, completely covering it, except for the ends.
It's almost meant to be... we'll just call it a DSDC, short for "Death Star Destruction Cannon".


Body Wrap Panel installation is complete... now for the gluing to make it tight.
I made some backers out of cardboard and installed them inside the bulkheads, should make filling the voids much easier.
I made some backers out of cardboard and installed them inside the bulkheads, should make filling the voids much easier.


2024-09-10
Finished gluing the Body Wrap, attached the Dowels to the Nacelles and did a dry fit mock up. This thing is huge.
I weighed the components and it's currently at 34.29 ounces. I'll need
to keep an eye on the weight... may have to fly this model naked unless I
get my L1 certificate.


Nacelle Dowel Glue Fillets...


2024 09-11
Attaching the Nacelles to the Nacelle Supports. Also updated the OpenRocket 3D Finished View.


2025-09-13
This rocket is rear eject and therefore the bore of the C-80 must be
smooth. When I attached the fins I perforated the wall of the C-80 so
the glue would soak through all the layers off the cardboard, this
process leaves a cheese grater surface on the bore of the tube.
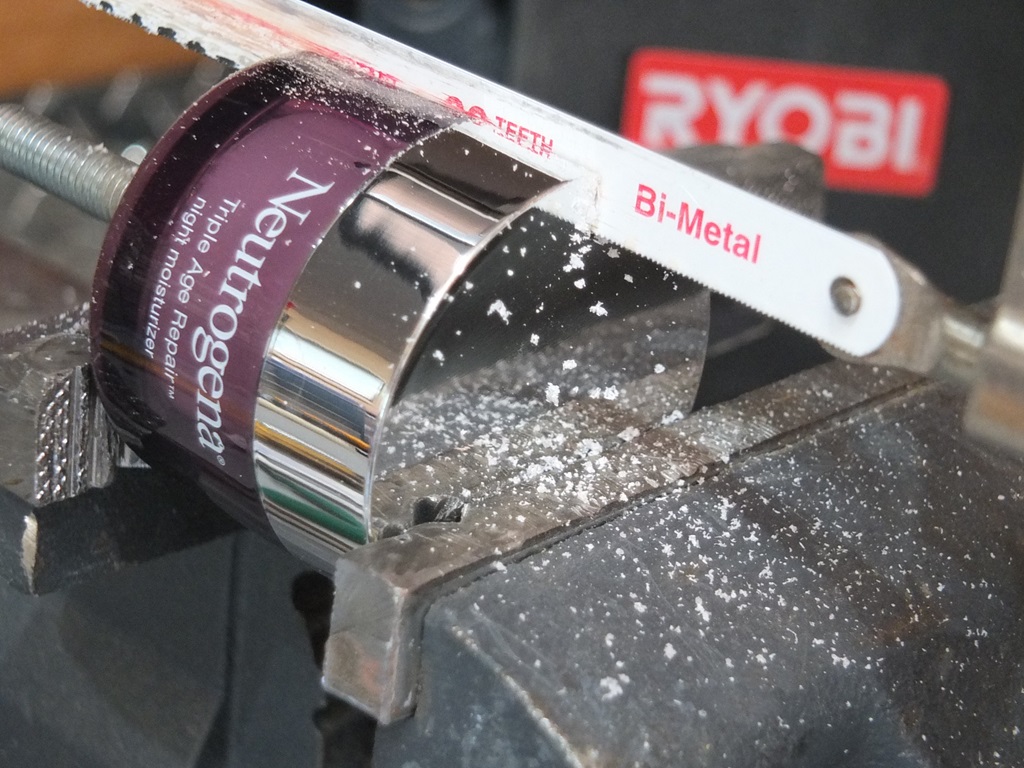
I used a Dremel to knock down the perforations, but the bore still needed to be sanded.
I made a sanding drum from a used Neutrogena jar. The jar is plastic and is a loose fit into the C-80. I bored a 1/2" hole into the bottom of the container and inserted a 3/8" dia. carriage bolt. I then cut a slot into the side of the container to hold a piece of sandpaper.
The sanding drum fits into the chuck of a cordless drill and is then used to sand the bore of the C-80 tubing.
After I was happy with the fit I blocked off the nose cone end and flooded the inside with watered down wood glue, then dumped the mixture out and ran a paper towels down the bore, like you'd clean the bore of a gun.
So now the Y-Wing has a nice smooth bore that's been fireproofed.
Link To Video: https://www.youtube.com/watch?v=QBxjWML1tWs
Link To Video: https://www.youtube.com/watch?v=XaA-mIP38gI&t=1s


2024-09-14
I finished the glue fillets and then glued the Command Module to the Fuselage.
Current weight is 1400 grams with the spool... which is in line with the OR simulation.
- I punched a 1/4" dia hole through the body, then wrapped two 3/16" wide pieces of masking tape around the hub of the Command Module for a good tight fit into the C-80.
- Applied a liberal amount of Gorilla Wood Glue and slid it into place.
- Topped of the wood glue by injecting it into the 1/4" dia. hole.


Ye ole glue fillet down inside the body tube.... basically filling up the chamfer that the hub had on it.

2024-09-17 Swing Test
I temporarily added the (2) pieces of ballast to the nose, loaded a chute and motor into the spool, and did a swing test.
Looks like we're a go for throttle up!
Final "All Up" weight was 1340 grams... that leaves plenty of room for greebles and paint.
Looks like we're a go for throttle up!
Final "All Up" weight was 1340 grams... that leaves plenty of room for greebles and paint.


I uploaded some photos into CAD and made some panelizing templates.


2024-10-21 Panelized the upper surfaces... still need to make the droid on my wood lathe.


2024-10-26 Co-Pilot Droid
I used a piece of 3/4" pine dowel to turn the R2-D2 droid, then used a Forstner bit to cut thru the cardboard body tube.
Your Co-Pilot, Your Buddy, Your Sidekick. Don't leave home without him... he's got your six.


2024-10-27: Primer, Day 01: Red Oxide Rustoleum Rusty Metal

2024-10-28 Primer Gray and White Flat Paint


2025-02-01
Masked off the paint pattern for the orange highlights. 1st sprayed
White Flat Rustoleum, then 10 minutes later the Gloss Orange Rustoleum.
Taking advantage of
the warm weather... got up to 53F today... crazy windy though.


